Checking pipe cross fitting Size: Pipe Fitting Measurements

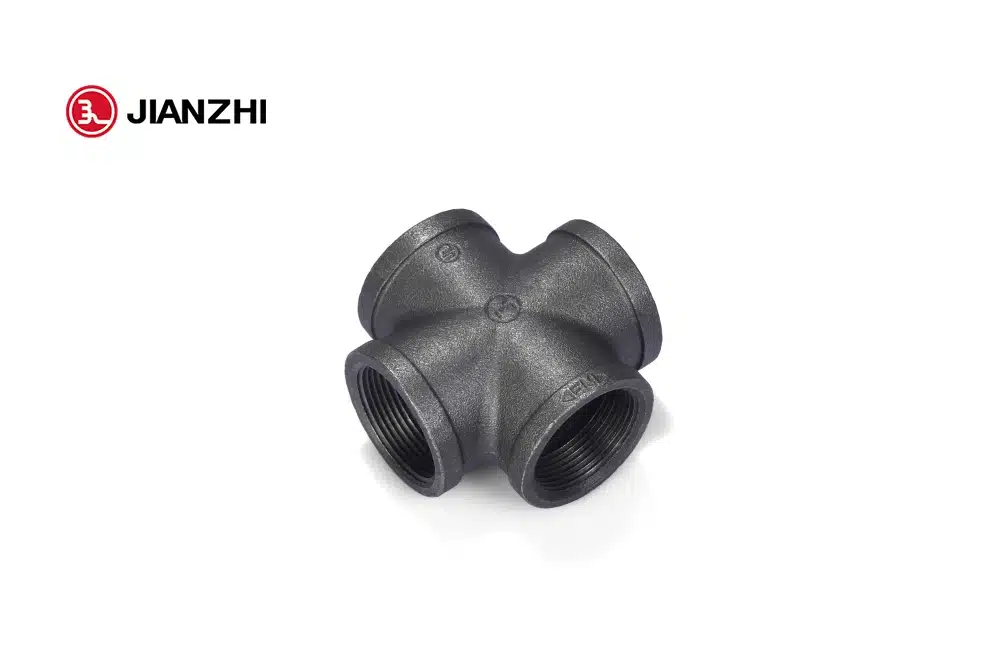
When checking the size of a pipe cross fitting, there are several measurements that need to be taken into account to ensure a proper fit.

Here are the key measurements to check:

Pipe size: The first measurement to check is the size of the pipe that the cross fitting is designed to fit. This is typically measured in inches or millimeters and is marked on the fitting itself. Make sure that the pipe size matches the size of the pipes being used in your plumbing system.

Wall thickness: The wall thickness of the pipe is another important measurement to consider. This will determine the depth of the socket that the pipe will fit into on the fitting. Make sure that the wall thickness of the pipe matches the socket depth of the fitting.

Center-to-center distance: The center-to-center distance is the distance between the center of one pipe opening to the center of the opposite opening on the fitting. This measurement is important to ensure that the cross fitting will fit properly within the plumbing system.

Angle of the cross: Cross fittings are designed to be either 90 degrees or 45 degrees. It’s important to choose the correct angle of the cross fitting for your plumbing system to ensure proper flow and stability.

Material: Cross fittings come in a variety of materials, including PVC, copper, brass, and stainless steel. Make sure to choose a fitting that is made from a material that is compatible with the pipes and fluids being used in your plumbing system.

By checking these measurements, pipe cross fitting you can ensure that the pipe cross fitting you select will fit properly within your plumbing system and provide reliable and efficient performance.

How do I measure the wall thickness of a pipe?

Measuring the wall thickness of a pipe is an important step in determining the correct size of fittings and other components that will be used in a plumbing system.

Here are the steps to measure the wall thickness of a pipe:

Clean the pipe: Before measuring the wall thickness, make sure the pipe is clean and free of any debris or residue.

Use a caliper: A caliper is a measuring tool that can be used to measure the wall thickness of a pipe. Open the caliper jaws and place them around the pipe, making sure that they are perpendicular to the surface of the pipe.

Close the jaws: Gently close the jaws of the caliper until they come into contact with the pipe. Use the locking mechanism on the caliper to keep the jaws in place.

Read the measurement: Look at the scale on the caliper to determine the measurement of the wall thickness. Make sure to measure at several points around the circumference of the pipe to ensure that the wall thickness is consistent.

Record the measurement: Write down the measurement of the wall thickness for future reference.

Alternatively, you can also use a wall thickness gauge to measure the thickness of the pipe. This tool can be placed on the surface of the pipe and provides a digital readout of the wall thickness.

It’s important to accurately measure the wall thickness of a pipe to ensure that the correct size of fittings and other components are used in the plumbing system. Using components that are not compatible with the wall thickness of the pipe can result in leaks, damage to the system, and other problems.

How do I determine the amount of vinyl floor planks I need for my project?

Bunnings is a large Australian home improvement retailer that offers a wide range of products, including vinyl floor planks. Vinyl floor planks are a popular choice for flooring due to their durability, low maintenance, and affordability.

Here are some key features and benefits of vinyl floor planks available at Bunnings:

Cost-effective: Vinyl floor planks are an affordable flooring option compared to other materials such as hardwood or ceramic tile.

Durability: Vinyl floor planks are made from high-quality materials that are resistant to scratches, stains, and water damage. They are also easy to clean and maintain.

Aesthetics: Vinyl floor planks are available in a range of colors and designs, making it easy to find a style that matches the décor of your home.

Easy to install: Vinyl floor planks are easy to install, requiring only basic tools and equipment. They can be installed over existing flooring in many cases, making it a popular choice for DIY projects.

Comfort: Vinyl floor planks are comfortable underfoot and have a slight give that can reduce fatigue and joint pain.

At Bunnings, vinyl floor planks are available in a variety of styles, including wood-look and stone-look options, as well as a range of colors and textures. The vinyl floor planks at Bunnings are often sold as individual planks or in packages, vinyl floor planks bunnings making it easy to purchase the right amount for your project. Bunnings also offers a range of accessories such as underlay, adhesive, and trim to help ensure a professional-looking finish.

To determine the amount of vinyl floor planks you need for your project, you will need to measure the area of the room or space where the flooring will be installed.

Here are the steps to follow:

Measure the length and width of the room in meters or feet, depending on your preferred unit of measurement.

Multiply the length and width measurements together to get the total square footage or square meters of the room. For example, if the room is 4 meters long and 3 meters wide, the total square footage is 12 square meters.

Add 10% to the total square footage to account for any waste or mistakes. This will give you the total amount of flooring needed for the project. For example, if the total square footage is 12 square meters, adding 10% would bring the total to 13.2 square meters.

Check the packaging of the vinyl floor planks you are interested in purchasing to determine how many square meters or square feet are included in each package. Divide the total amount of flooring needed for the project by the amount included in each package to determine how many packages you will need to purchase.

It’s always a good idea to purchase a little extra vinyl floor planks to ensure that you have enough to complete the project. Having extra planks on hand can also be helpful in case repairs or replacements are needed in the future.

How does double wire fence compare to other high-security fencing materials?

Double wire fence is a popular choice for high-security fencing and has its own unique set of features and benefits compared to other high-security fencing materials.

Here’s how double wire fence compares to some other common high-security fencing materials:

Wrought iron: Wrought iron fencing provides a high level of security and durability, but it can be more expensive than double wire fence. Wrought iron fencing can also be more difficult to install and may not be as customizable as double wire fence.

Aluminum: Aluminum fencing is a lightweight and durable option for high-security fencing, but it can be more expensive than double wire fence. Aluminum fencing can also be more difficult to install and may not be as strong as double wire fence.

Chain link with barbed wire: Chain link fencing with barbed wire provides a high level of security, double wire fence but it can be more dangerous and difficult to install than double wire fence. Chain link fencing with barbed wire can also be more expensive than double wire fence.

Welded wire mesh: Welded wire mesh fencing is a strong and durable option for high-security fencing, but it can be more expensive than double wire fence. Welded wire mesh fencing can also be more difficult to install and may not be as customizable as double wire fence.

Overall, double wire fence is a versatile and cost-effective high-security fencing material that is suitable for a range of applications. While other high-security fencing materials may have their own unique features and benefits, double wire fence is a popular choice for its strength, durability, low maintenance, and customizable design.

How does the cost of double wire fence compare to other high-security fencing materials?

The cost of double wire fence compared to other high-security fencing materials can vary depending on a variety of factors such as the size of the area being fenced, the level of security required, and the materials used. However, in general, double wire fence is a cost-effective option compared to other high-security fencing materials.

Wrought iron and ornamental steel fencing are popular high-security fencing options, but they can be more expensive than double wire fence due to the cost of the materials and the complexity of the installation. Aluminum fencing is another high-security option that is often less expensive than wrought iron but can still be more expensive than double wire fence.

Chain link fencing with barbed wire is a more affordable high-security option than wrought iron or aluminum, but it may not be as durable or secure as double wire fence. Welded wire mesh is another high-security option, but it can be more expensive than double wire fence due to the cost of the materials and the complexity of the installation.

Overall, double wire fence is a cost-effective high-security fencing material that provides a good balance between security, durability, and affordability. It is a popular choice for commercial and industrial properties, sports facilities, and public spaces where security is a top priority.

How does the swash plate design of the PV080 piston pump contribute to its efficiency?

The swash plate design of the PV080 piston pump is an important factor in its high efficiency. Here’s how it works:

The swash plate is a sloping disk that is mounted on the drive shaft of the pump. The pistons are arranged in a circular pattern around the swash plate, and their heads are in contact with the surface of the swash plate. As the drive shaft rotates, the swash plate tilts, causing the angle of the pistons relative to the cylinder block to change.

As the angle of the pistons changes, the volume of the pump’s cylinder block also changes. When the pistons are at their highest angle, the volume of the cylinder block is at its smallest. As the swash plate tilts, the pistons move down the slope, which increases the volume of the cylinder block and draws hydraulic fluid into the pump.

As the swash plate continues to tilt, the pistons move back up the slope, which decreases the volume of the cylinder block and forces hydraulic fluid out of the pump and into the hydraulic system. By adjusting the angle of the swash plate, the pump can vary the volume of fluid being delivered, which allows it to match the flow rate to the requirements of the hydraulic system.

The swash plate design of the PV080 piston pump enables it to achieve high volumetric efficiency, which means that it can deliver a high volume of fluid per revolution of the drive shaft. This is because the swash plate design ensures that the pistons are always in contact with the cylinder block, which minimizes the amount of fluid that is lost due to leakage.

In addition to its high volumetric efficiency, the swash plate design also helps to reduce noise levels and minimize wear on the pump’s components. This is because the swash plate design enables the pump to operate at a relatively low speed, parker pv080 piston pump which reduces the amount of noise and vibration generated by the pump. The swash plate design also ensures that the pistons are always in contact with the cylinder block, which helps to distribute loads evenly and minimize wear on the pump’s components.

Overall, the swash plate design of the PV080 piston pump is an important factor in its high efficiency and reliable operation.

How does the swash plate design of the PV080 piston pump compare to other designs?

The swash plate design of the PV080 piston pump is one of several designs used in axial piston pumps.

Here are some of the key differences and advantages of the swash plate design compared to other designs:

Swash plate vs. bent axis design: The swash plate design, as described above, features a sloping disk that is mounted on the drive shaft and controls the angle of the pistons. In contrast, the bent axis design features a bent or angled drive shaft that causes the pistons to move in and out of the cylinder block. The swash plate design is generally considered to be more efficient and compact than the bent axis design, although the bent axis design may be better suited for certain applications.

Swash plate vs. wobble plate design: The wobble plate design features a fixed outer ring and a wobbling inner ring that controls the movement of the pistons. The swash plate design is generally considered to be more efficient and reliable than the wobble plate design, although the wobble plate design may be simpler and less expensive to manufacture.

Advantages of the swash plate design: The swash plate design offers several advantages over other designs. For example, it provides precise control over the flow of hydraulic fluid, which allows for more efficient operation and reduced energy consumption. It is also relatively compact and lightweight, which makes it well-suited for use in mobile equipment and other applications where space is limited. Additionally, the swash plate design is generally considered to be more reliable and durable than other designs, due to its ability to maintain consistent contact between the pistons and cylinder block.

Overall, while there are other designs available for axial piston pumps, the swash plate design of the PV080 piston pump is widely recognized as a highly efficient, reliable, and versatile design that is well-suited for a wide range of hydraulic applications.

How can I tell if a track link is compatible with my excavator?

A track link is an essential component of an excavator’s undercarriage system. It connects the excavator’s track shoe to the main frame of the machine and is responsible for supporting the weight of the excavator and providing traction on the ground.

Here are some key considerations when selecting a track link for an excavator:

Size and compatibility: The track link must be compatible with the make and model of the excavator. Check the manufacturer’s specifications to ensure that the track link is the correct size and has the appropriate mounting holes and bolt patterns.

Material and construction: Track links are typically made from high-strength steel and may be heat-treated to improve durability. Look for a track link that is made from high-quality materials and has been manufactured to strict quality standards.

Weight and strength: The weight and strength of the track link should be appropriate for the size and weight of the excavator. A heavier excavator may require a heavier-duty track link to support its weight and provide adequate traction.

Wear resistance: The track link should be designed to resist wear and damage from the harsh operating conditions of an excavator. Look for a track link that is designed to resist abrasion, impact, and other forms of damage.

Ease of installation: The track link should be easy to install and remove, with clear instructions and documentation provided by the manufacturer.

Price and warranty: Compare the prices and warranty terms of different track link suppliers to ensure that you are getting a good value for your purchase. Look for a supplier that offers a comprehensive warranty and stands behind their products.

Overall, selecting the right track link for an excavator requires careful consideration of several factors, including size and compatibility, material and construction, weight and strength, wear resistance, ease of installation, and price and warranty.track link excavator By choosing a high-quality track link that is designed to meet the specific needs of your excavator, you can help ensure reliable performance and minimize downtime.

To determine whether a track link is compatible with your excavator, you will need to consider several factors.

Here are some steps you can take to ensure that the track link you select is compatible with your excavator:

Check the excavator’s specifications: Consult the manufacturer’s specifications for your excavator to determine the size and type of track link that is required. This information may be available in the operator’s manual or other documentation provided by the manufacturer.

Determine the pitch and link count: Measure the pitch of the existing track link or count the number of links to determine the pitch and link count required for a replacement track link. The pitch is the distance between the centers of adjacent pins, and the link count refers to the number of links in the track.

Check the bolt pattern and mounting holes: Verify that the bolt pattern and mounting holes of the replacement track link match those of the excavator’s existing track link. This can help ensure that the track link can be properly installed and secured to the excavator.

Consider the weight and load capacity: Ensure that the replacement track link is designed to support the weight and load capacity of the excavator. This can help ensure that the track link is durable and able to withstand the rigors of heavy use.

Verify the manufacturer’s recommendations: Check the manufacturer’s recommendations for the specific excavator model to ensure that the replacement track link meets the necessary specifications and requirements.

Consult a professional: If you are unsure whether a particular track link is compatible with your excavator, consult a professional, such as a dealer, manufacturer, or service technician. They can help you select a track link that is compatible with your excavator and meets your specific needs.

Overall, ensuring that a track link is compatible with your excavator requires careful consideration of several factors, including the excavator’s specifications, pitch and link count, bolt pattern and mounting holes, weight and load capacity, manufacturer’s recommendations, and the advice of a professional. By selecting a compatible track link, you can help ensure reliable performance and minimize downtime.

Advantages Of Successful ggg50 butterfly valve

The successful implementation of a GGG50 butterfly valve (which refers to a butterfly valve made from ductile iron with a grade of GGG50) offers several advantages, including:

Strength and durability: Ductile iron, such as GGG50, is known for its high strength and durability. This material can withstand high pressures and provide excellent resistance to mechanical stresses, making the butterfly valve robust and capable of handling demanding applications.

Corrosion resistance: Ductile iron butterfly valves, including GGG50, have good corrosion resistance. This makes them suitable for use in various environments, including those with corrosive fluids or in industries where corrosion is a concern. The valve’s resistance to corrosion ensures a longer service life and reduces the need for frequent maintenance or replacement.

Cost-effective: GGG50 butterfly valves offer a cost-effective solution compared to some other materials like stainless steel. Ductile iron is often more affordable while still providing satisfactory performance and durability. This makes GGG50 butterfly valves an attractive option for projects and applications where cost considerations are important.

Wide range of applications: GGG50 butterfly valves are versatile and suitable for a wide range of applications across different industries. They can be used for controlling the flow of various fluids, including water, gases, chemicals, and slurries. The valves are commonly found in water treatment plants, HVAC systems, power generation, wastewater management, and industrial processes.

Efficient flow control: Butterfly valves, including GGG50, provide efficient flow control due to their low pressure drop. The streamlined design of the valve disc allows for smooth fluid passage, minimizing flow restrictions and energy losses. This efficient flow control can contribute to improved system performance and energy efficiency.

Quick operation: Butterfly valves offer quick and easy operation. They can be opened or closed rapidly with a simple quarter-turn motion, allowing for swift adjustments in flow rates or shut-off when necessary. The quick operation of GGG50 butterfly valves can be beneficial in emergency situations or when precise flow control is required.

Maintenance-friendly: Ductile iron butterfly valves, including GGG50, are generally low maintenance. The robust construction and corrosion-resistant properties reduce the need for frequent inspections or repairs. Additionally, the design of butterfly valves often allows for easy access to internal components, simplifying maintenance tasks and reducing downtime.

When selecting a butterfly valve, it’s essential to consider the specific requirements of your application and consult with valve manufacturers or experts to ensure the chosen valve meets your needs in terms of pressure rating, size, compatibility, and other relevant factors.

The Different Types of Industrial Valves

There are several types of industrial valves used in various applications and industries. Here are some of the most common types:

Gate Valve: Gate valves control the flow of fluid by raising or lowering a gate-like disc. They provide a full unobstructed flow path when fully open and offer a tight shut-off when fully closed. Gate valves are commonly used in applications where on/off control is required.

Globe Valve: Globe valves have a spherical-shaped body with a movable disc that controls flow by moving up and down against the flow path. They are suitable for regulating flow rates and offer good throttling capabilities. Globe valves are often used in industries such as oil and gas, power generation, and water treatment.

Ball Valve: Ball valves use a spherical ball with a hole or port in the center to control flow. The ball rotates within the valve body to open or close the flow path. Ball valves provide quick, reliable, and tight shut-off and are commonly used in applications where fast on/off control is needed.

Butterfly Valve: Butterfly valves have a disc or plate positioned in the center of the pipe, which rotates to control flow. The disc is mounted on a shaft and can be positioned perpendicular or parallel to the flow path, allowing for on/off and throttling control. Butterfly valves are compact and suitable for large-scale applications.

Check Valve: Check valves, also known as non-return valves, allow flow in one direction and prevent backflow in the opposite direction. They have a hinged or spring-loaded disc that opens when the fluid flows in the desired direction and closes to prevent reverse flow. ggg50 butterfly valve Check valves are commonly used to prevent damage to equipment and maintain system integrity.

Diaphragm Valve: Diaphragm valves use a flexible diaphragm to control flow. The diaphragm seals off the flow path when it is compressed against a stationary seat. Diaphragm valves are often used in applications where preventing contamination or leakage is crucial, such as in the pharmaceutical or food industries.

Plug Valve: Plug valves have a cylindrical or cone-shaped plug that rotates to control flow. When the plug is in line with the flow path, fluid can pass through, and when the plug is perpendicular to the flow, it shuts off the flow. Plug valves are commonly used in applications with abrasive or corrosive fluids.

Needle Valve: Needle valves have a long, tapered needle-like stem that controls flow through a small orifice. They provide precise flow control and are commonly used in applications where fine adjustments are required, such as in instrumentation or laboratory settings.

These are just a few examples of the many types of industrial valves available. Each valve type has its own design, functionality, and suitability for specific applications. The selection of the appropriate valve depends on factors such as the type of fluid, pressure and temperature requirements, flow control needs, and industry-specific considerations.

What are some common signs of Resisting high temperature Refractory Brick?

Here are some common signs that indicate refractory bricks have good high temperature resistance:

Low thermal expansion

Refractory bricks that are designed to withstand high temperatures will typically have a low coefficient of thermal expansion. This means they expand very little when heated, reducing the risk of cracking.

Good dimensional stability

The bricks will maintain their shape and size stability even after repeated heating and cooling cycles. Dimensionally stable bricks can better withstand thermal shock.

Dense microstructure

On a microscopic level, high temperature resistant refractory bricks will have a dense, non-porous microstructure with few capillaries or voids. This helps reduce material transport mechanisms that can cause degradation.

Low moisture content

The bricks will have a very low amount of chemically bound water that can be released when heated. Moisture release can cause spalling and damage at high temperatures.

Refractory material composition

The chemical composition of the brick, specifically the selection of aggregates and bonding materials, is optimized to withstand the intended operating temperature range. Materials like alumina, zirconia, chromia, etc. are common.

High resistance to corrosion

The brick surfaces will show little evidence of material loss, decomposition or erosion when exposed to flue gases and operating conditions at high temperatures. Corrosion resistance indicates stability.

Refractory bricks designed by Resisting high temperature Refractory Brick Supplier for resisting high temperatures tend to exhibit properties like low thermal expansion, good dimensional stability, a dense microstructure, low moisture content, a refractory composition tailored for the operating conditions and high resistance to corrosion when exposed to those conditions over time.

What is the typical turnaround time for custom metal label orders?

The turnaround time for custom metal label will depend on a few factors:

Order size

Larger orders with hundreds or thousands of labels will generally take longer than smaller orders.

Metal type

Certain metals like stainless steel or titanium may be sourced from different suppliers and take more time.

Label thickness

Heavier gauge labels require more material and time to manufacture.

Engraving details

More complex graphics, logos or text on the labels can lengthen the setup and engraving process.

Production capacity

The workload and capacity of the manufacturer also impacts how quickly they can fulfill your order.

With that in mind, here are some general guidelines for typical turnaround times:

Small orders (up to 50-100 pieces)

1-2 weeks is typical for simple designs in common metals.

Medium orders (100-500 pieces)

2-3 weeks is common for medium sized orders, depending on the complexity.

Large orders (500+ pieces)

At least 3-6 weeks should be expected for large bulk orders and those with very complex engraving needs.

Rush orders

It may be possible to expedite certain orders, especially small ones, for an additional rush fee. However, this still depends on the manufacturer’s capacity.

Many factors influence the timeline, so it’s best to consult with individual manufacturers to get a custom quote for your specific label requirements. They can provide a more accurate estimate based on:

Your desired metal and label dimensions
The level of detail in the engraving or logo
The complexity of any attachments or mounting hardware
The quantity you need produced

Overall, at least 1-2 weeks should be expected for most simple metal label orders. But for large bulk orders, orders with intricate engraving or those using special metals, turnaround times of 3-6+ weeks are common.

What are the advantages and disadvantages of black pipe cross fitting?

Here are some key advantages and disadvantages of black pipe cross fittings:

Advantages:

Low cost.

Black pipe cross fittings are generally very inexpensive compared to welded or threaded pipe joints. They are a simple and budget-friendly option.

Quick and easy installation.

Cross fittings can be installed very quickly with basic tools. They provide a fast and easy way to connect and join black iron pipe sections.

Corrosion resistance.

The compression seal created by the fitting and pipe o-rings helps prevent leaks and corrosion.

Adjustability.

The fittings can adjust to some minor variations in pipe diameter or shape. This allows for an easier installation.

Disadvantages:

Weaker joint.

Cross fittings may not provide quite as strong or gas-tight of a joint as welded or threaded pipes. There is a slightly higher chance of leaks.

Limited pipe sizes.

Cross fittings typically only come in limited pipe size options, like 1/2 inch to 2 inches. Larger sizes may not be available.

Prone to overtightening.

If overtightened, the cross fittings can damage the pipe or distort its shape. Proper tightening technique is important.

Gas or liquid specific.

Cross fittings are designed to work with either gas/air or liquid plumbing. Using them for the wrong application could lead to leaks or safety issues.

Not standard pipe thread.

The fittings have non-standard threads that do not match standard pipe threads. They cannot be used with most threaded pipe or bushings.

Difficult disassembly.

If a cross fitting needs to be removed, it can be difficult to disassemble the joint without damaging the pipe. threaded or welded pipes can typically be disassembled more easily.

How can I test the hydraulic cylinder to ensure it is functioning properly?

After repacking a hydraulic cylinder, it is important to test the cylinder to ensure it is functioning properly.

Here are some ways to test the hydraulic cylinder:

Check for leaks: Before operating the equipment, visually inspect the hydraulic cylinder for any leaks. Look for any signs of oil around the cylinder seals or fittings.

Operate the equipment: Operate the equipment and observe the hydraulic cylinder for any signs of malfunction. Listen for any unusual noises or vibrations, and watch for any unexpected movements or jerking.

Check the pressure: Use a pressure gauge to check the pressure of the hydraulic system. Compare the pressure readings to the manufacturer’s specifications to ensure they are within the recommended range.

Perform a load test: If the equipment is designed to handle a load, perform a load test to ensure the hydraulic cylinder can handle the required weight. This may involve lifting or moving a heavy object to test the hydraulic cylinder’s performance.

Check the cylinder stroke: Check the cylinder stroke to ensure it is within the manufacturer’s specifications. This can be done by measuring the distance the cylinder extends and retracts, and comparing it to the recommended stroke length.

By testing the hydraulic cylinder, you can ensure that it is functioning properly and avoid any potential safety hazards or equipment damage. If you notice any issues during testing, it is important to address them immediately before operating the equipment.

How can I perform a load test on the hydraulic cylinder?

Performing a load test on a hydraulic cylinder involves applying a load or weight to the equipment to ensure repacking a hydraulic cylinder the hydraulic cylinder can handle the required weight.

Here are some general steps to perform a load test on a hydraulic cylinder:

Determine the load: Determine the amount of weight or load that the equipment is designed to handle. This information can usually be found in the equipment manual or specifications.

Secure the load: Secure the load to the equipment, ensuring that it is properly balanced and distributed.

Operate the equipment: Operate the equipment and observe the performance of the hydraulic cylinder. Watch for any signs of malfunction, such as slow or uneven movement, or unusual noises or vibrations.

Monitor the pressure: Monitor the pressure of the hydraulic system during the load test. Use a pressure gauge to check the pressure readings and compare them to the manufacturer’s specifications.

Check the cylinder stroke: Check the cylinder stroke during the load test to ensure it is within the recommended range. Measure the distance the cylinder extends and retracts and compare it to the manufacturer’s specifications.

Record the results: Record the results of the load test, including the weight of the load, the pressure readings, and any observations or issues that were noticed during the test.

By performing a load test on the hydraulic cylinder, you can ensure that it can handle the required weight and is functioning properly. If you notice any issues during the load test, it is important to address them before operating the equipment.